Wednesday, March 25, 2009
container vegetable garden
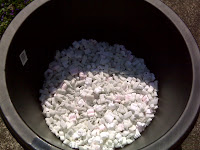
As you all know, I have a thirty year old house that has thirty year old trees. This being said, I have very limited full sun exposure. I am also very interested in growing some of my own produce. Because fruits and vegetables need full sun for optimal health, I have decided to think outside of the box and create a rotating container vegetable garden- on my driveway. First up-lettuce. I purchased a pre-formed pond liner and drilled drainage holes in the bottom. I then went to my local shipping store and asked for some packing peanuts. I filled the container 1/4 full with the packing peanuts(for ease of movement, and because lettuce has a shallow root system) and then layered in organic garden soil, premium top soil and good old composted cow manure. I planted 7 Buttercrunch and 7 Red Sail lettuces as well as three marigolds for good measure. As we all know, rabbits love lettuce and because this is approximately two feet off the ground and is solid, my thought is that they won't climb and can't burrow but if that doesn't stop them the marigolds will. My final step is to locate an old whiskey barrel half to mount it in so it looks more intentional from the street. Will follow with more pictures when the lettuce has matured a bit.
Thursday, March 19, 2009
composting continued
Hopefully you have been inspired to begin collecting or rather re purposing your everyday kitchen and yard scraps into valuable "black gold."
Location is very important when deciding where to place your compost bin. Look for somewhere around your yard that is sunny, convenient to the house, and near a source for adding water. You may want to remove the grass/groundcover underneath your compost bin to invite earthworms and help improve drainage. The other option is to compost on pavement or concrete. Convenience is key.
Begin by adding your kitchen scraps, making sure to chop up any large pieces and to layer leaves, soil or other "brown" material-turn the pile with a pitchfork. Turning is a key part of the compost process as it serves to add essential oxygen into the pile.
Finish by adding water-enough to achieve the consistency of a wrung out sponge.
Have fun and more to follow...
Monday, March 16, 2009
all i am saying is give composting a chance....
I can't say enough about the benefits of compost. Whether you buy it or make it, nothing works better to amend and enrich soil. One of the first things I did when I knew we were buying a house was contact the city and see if they offered compost bins. Much to my delight, they had one Earth Machine left from a campaign they had run in previous years. This compact compost bin made by Norseman Plastics is the perfect size for an urban setting. Compost bins can easily be constructed as well and how-to's are all over the internet. For "healthy" compost you need a mix of green (nitrogen-rich) and brown (carbon-rich) materials.
Kitchen greens consist of the following:
fruit and vegetable scraps
houseplant cuttings
coffee grounds/tea bags
rice and pasta
egg shells
Kitchen browns consist of the following:
coffee filters
paper napkins/towels
dryer lint
hair
Yard greens:
flowers
hedge clippings
grass (small amounts)
Yard browns:
dried leaves
straw/hay
dried grass
Never compost meat, dairy, oils/fats, pet waste, or mature weeds
Start collecting in your kitchen bucket and I'll follow up soon with what to do next.
Friday, March 13, 2009
Sunday, March 8, 2009
bare root experiment
As I was perusing my local discount garden center, just past the solar lighting, I discovered a section of various bare root and bulb plants. Normally I would just continue walking however, they had a significant selection of ferns. As a vast majority of my lawn is engulfed in thirty year old trees I am always on the look out for shade loving plants-ferns at the top of my list. Painted, Lady, Cinnamon and the mother of all ferns, the Ostrich. How could I pass up four Ostrich fern plants for five dollars? The only other bare root plant that I tried with zero success was a pricey butterfly plant (not bush) from a reputable catalog-how could I go wrong. So I've potted them up to monitor their growth before putting them in the ground. FYI there were only three in the package but who's counting.
Saturday, March 7, 2009
i don't wanna....
So I may be the only gardener in the world-or average homeowner- who, when given a beautiful, cloudless, sunny day in early March doesn't want to go out and work in the yard. Maybe because when it was sunny in November, December, January, and February I was out. Or maybe it's because rarely is it so beautiful when I have a weekend off. I am giving myself permission to be completely lazy today and know that there is always tomorrow.
Monday, March 2, 2009
Subscribe to:
Posts (Atom)